Overview
The purpose of our backup system is to create and periodically update
snapshots of selected directories while retaining, for some time, copies
of files that have been deleted or changed.
In order to use our backup system, the user needs to purchase backup
storage (see
pricing). For increased data safety, the backup storage servers are
located in Weill Hall, separately from the rest of our computational
infrastructure.
After purchasing backup storage, the user specifies one or more
directories they wish to back up. Each such directory becomes a backup
root. A typical example would be your home directory, although it is
also possible to specify other directories, such as a subdirectory of your
home directory, home2 directory, or a directory located on one of the
hosted servers. Each backup root is backed up entirely
(recursively with all files and subdirectories) except
subdirectories or files explicitly excluded or those whose path contains
string NOBACKUP.
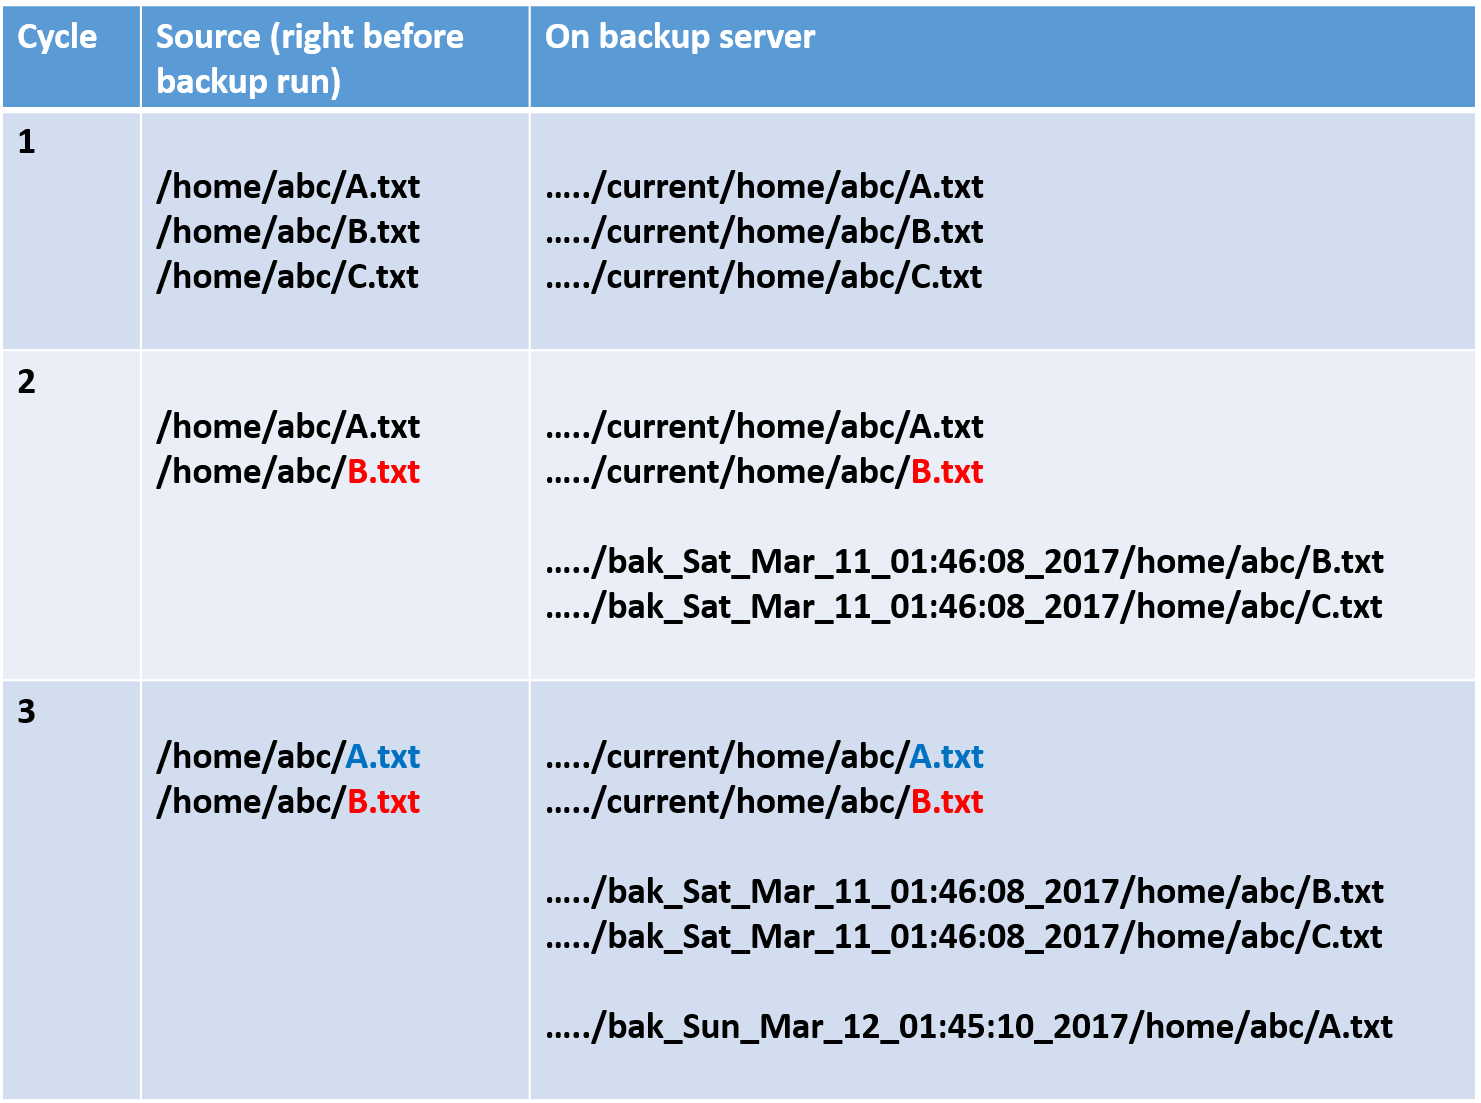
When backup of a given directory is being done for the first time, the
entire directory (except exclusions) will be copied to the backup server,
i.e., its current snapshot will be created reflecting the
directory's state at backup time. Next time the backup runs, this current
snapshot will be updated, i.e., files removed, added, or changed by the
user in the meantime in the source directory will be also removed from,
added to, or changed in the current snapshot. However, the files that have
been removed, as well as previous versions of those that changed, will be
saved on the backup server in a backup snapshot labeled with
backup date and time. The backup snapshot contains only files
that have been changed or removed by the user from the source directory
since the previous backup cycle. Subsequent backup cycles will update the
current snapshot, create new, dated backup snapshots, and remove the older
ones. This process is illustrated in the figure below.
Thus, the backup server will always contain the current snpashot,
reflecting the state of the directory from before the latest backup, plus
a number of dated backup snapshots containing files changed or removed
between previous backup cycles. Multiple snapshots facilitate retrieval of
old versions of all files, whenever needed. The maximum age of the backup
snapshots to be kept as well as backup frequency are configurable by the
user.
Parameters controling backup
Backup is controled by three parameters, set individually for each backup
root directory:
- Retention: age (in days) of the oldest version of the backup
root directory to be kept
- Frequency: backup frequency (e.g., setting this to 3 means
backup of this directory will be run every 3 days)
- MinSave: minimum number of old versions of the directory to be
saved always, regardless of age (prevents a possibility of all previous
versions being erased if the original directory is not changed for
longer than Retention days)
Besides setting these parameters, the user can also specify exclusions
- files and/or subdirectories of the backup root to be omitted
from the backup process.
Typical backup scenarios
Depending on your needs, you may consider two basic backup strategies: back
up most, exclude some
and back up some, exclude most.
- back up most, exclude some: Specify some top-level directory
(such as your home directory) as backup root, possibly with a few
exclusions. The advantage is that all changes you make to this directory
(except excluded parts) will be reflected in the backup without you
taking any extra effort. However, if you add some large files which you
did not really intend to back up but forget to exclude them, they will
be copied to the backup server and you will be charged for space-time
they occupy.
- back up some, exclude most: Backup only one (or more)
individual subdirectory of your home directory, the content of which you
consider most important. To do this, you need to specify this
subdirectory (rather than your entire home directory) as backup root.
The advantage is that changes you make outside of backup root will not
junk up the backup. However, if any of these changes are important but
you forget to copy or move them into backup root, these changes will not
be reflected in the backup.
How to purchase backup storage
- Login to the "Bioinformatics Facility"
web site using "Login" menu item on the upper right.
- select My Storage from the User Drop-down.
- First time users must start by purchasing backup storage by clicking
on the Purchase Backup Credit button on the bottom of the My
Storage page.
- Backup storage is purchased in 1 TB-year increments, similarly as our
main storage. How long your purchased storage will last depends on
the backup size - it is similar to storage-quota relation (see 'Storage rates and charging' on the
main storage page for details). This means if you purchase
1TB-year of backup storage and your backup size is 0.5 TB then your
1TB-year of purchased backup storage will last 2 years. If you backup
size is 2TB then your 1TB-year purchase will expire after 6 months.
- Backup storage used to date is calculated daily and reported on your My
Storage page. The remaining backup storage is recomputed
accordingly.
- A default name is given to your new Backup Credit Account after you
accept the purchase and an invoice is created (the name may be changed
after the purchase from the status table on the My Storage
page).
Specify backup root directories
- Click on the Manage Backup button on the bottom of the My
Storage page.

- Enter the directory you want to backup (backup root) in the
text box and click on the Add Directory to Backup button
- Use the default Server: Network Storage to specify directories
which start with /home.
- You may change "Network Storage" in the Server text box to the name of
any specific server which you can access and where you have files that
require backup. This typically applies to BioHPC hosted servers.
- Once a backup root directory has been added, you will be able
to edit the Retention, Frequency and MinSave
parameters (click the Edit button) and add or remove exlcusions
(click Manage Excludes). Click Stop Backup to stop
backing up this directory and remove it from your list of backup
roots (of course, this operation does not in any way affect the
source directory).

- Repeat the above steps for all directories you would like backed up.
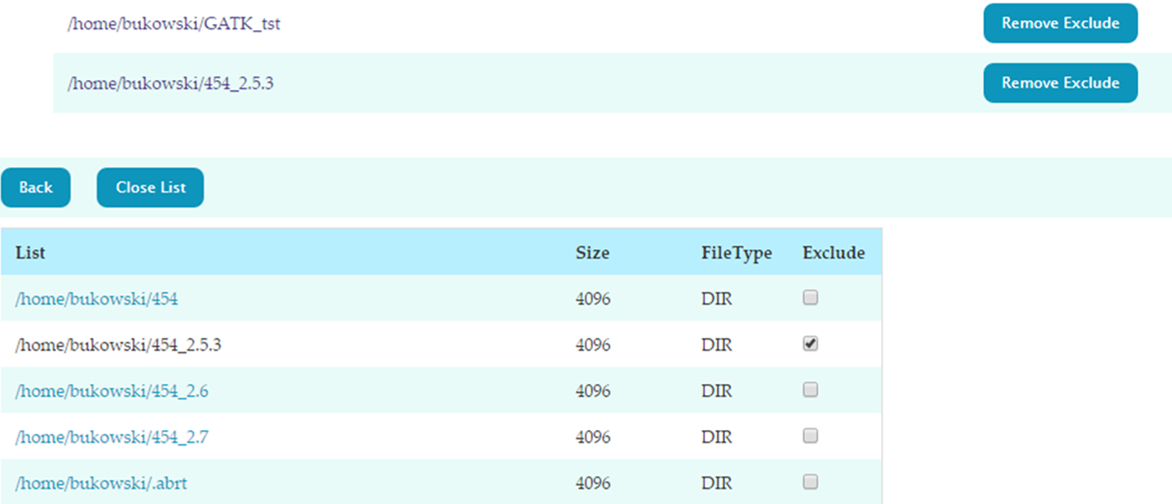
Exclude directories and/or files from backup
roots
- Click on the Manage Excludes button to list the content of the
backup root directory
- Click on the Exclude checkbox to exclude a file or a
subdirectory from backup
- Enter a subdirectory by clicking on its link, then exclude files
and/or subdirectories within it, etc.
- Exclusions can be removed by clicking on the Remove Exclude
button, or by un-checking a box on the directory listing.
In addition to the mechanism described above, any object within a backup
root will be excluded if the string
NOBACKUP occurs in this object's path. If the object is a
directory, it will be excluded along with all
its content. For example, files
/home/bukowski/TST/someNOBACKUP_file.txt
/home/bukowski/NOBACKUP/otherfile.csv
will both be excluded. In fact, the entire directory /home/bukowski/NOBACKUP/
will be excluded recursively.
On the other hand, other files and subdirectories in /home/bukowski/TST/
wil be backed up (as long as the string
NOBACKUP does not occurr further in the path).
Checking the status of your backup account
Once the backup root directories are configured, the My
Storgae page will contain the summary of your backup storage
account, updated daily. Check this page regularly. You will be notified by
e-mail when your purchased backup storage is about to run out. If needed,
purchase more credit, or reduce the backup size by adding more exclusions
or removing backup roots you no longer need (Manage Backup
button).

Accessing your backup
Backup directories are exported from backup server and mounted on our
login nodes, cbsulogin.tc.cornell.edu and cbsulogin2.tc.cornell.edu.
Each user-specified backup root has a corresponding location under
/backups/backup1 on both login nodes. This location reflects the
owner, source server, and backup root. The picture below shows three
examples, with different parts of the path color-coded for clarity.
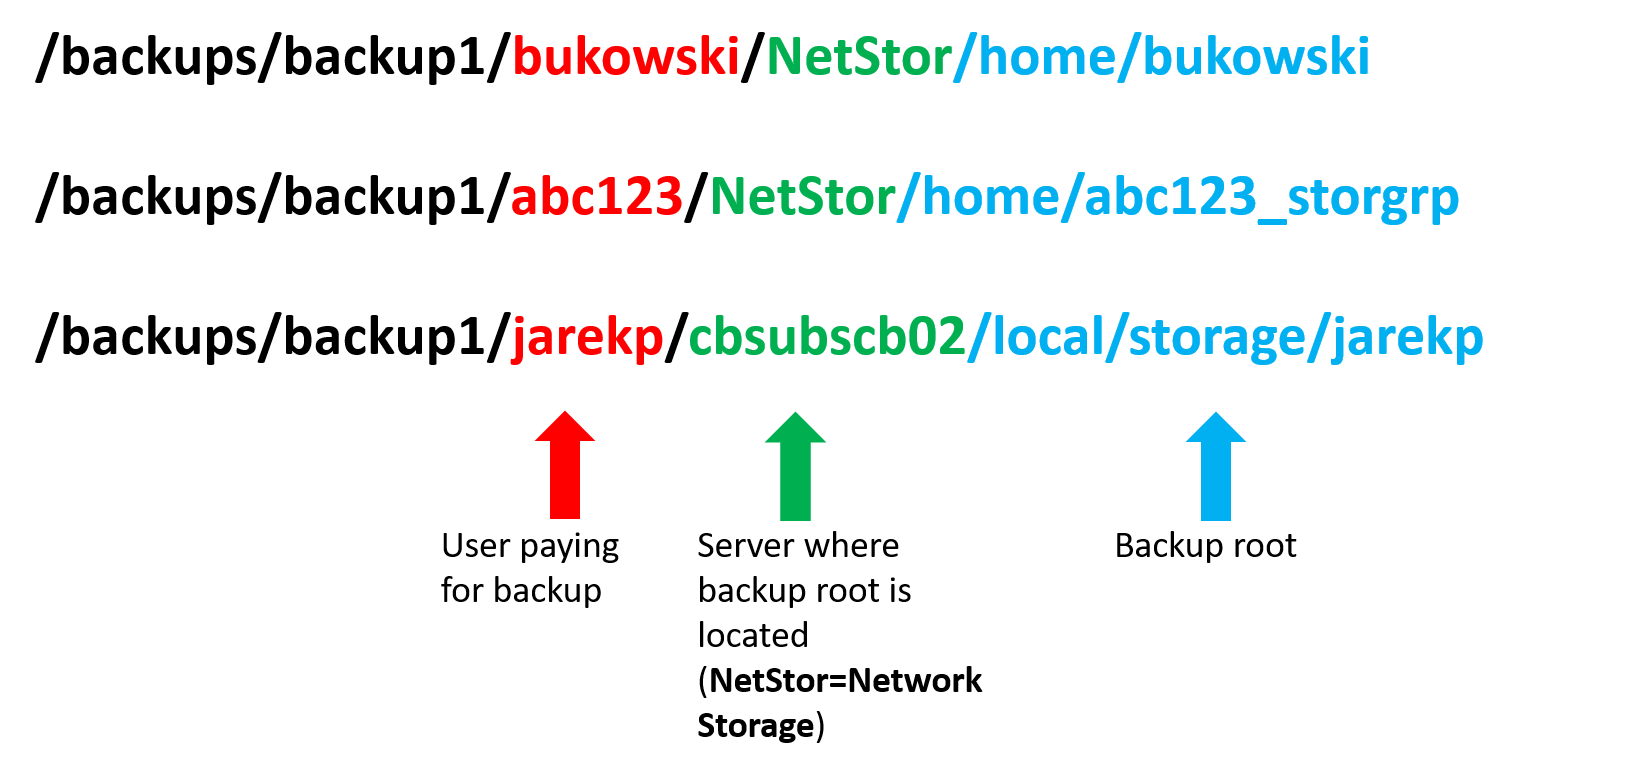
The first backup root is one user's home directory located on
Network Storage. The second is an example of a storage group
space, also located on Network Storage under /home. The last
backup root is a directory located on a hosted server cbsubscb02.
Each of these locations is, in turn, organized in current snapshot
and backup snapshot directories. For example, listing the content
of the first of the directories above will show output similar to
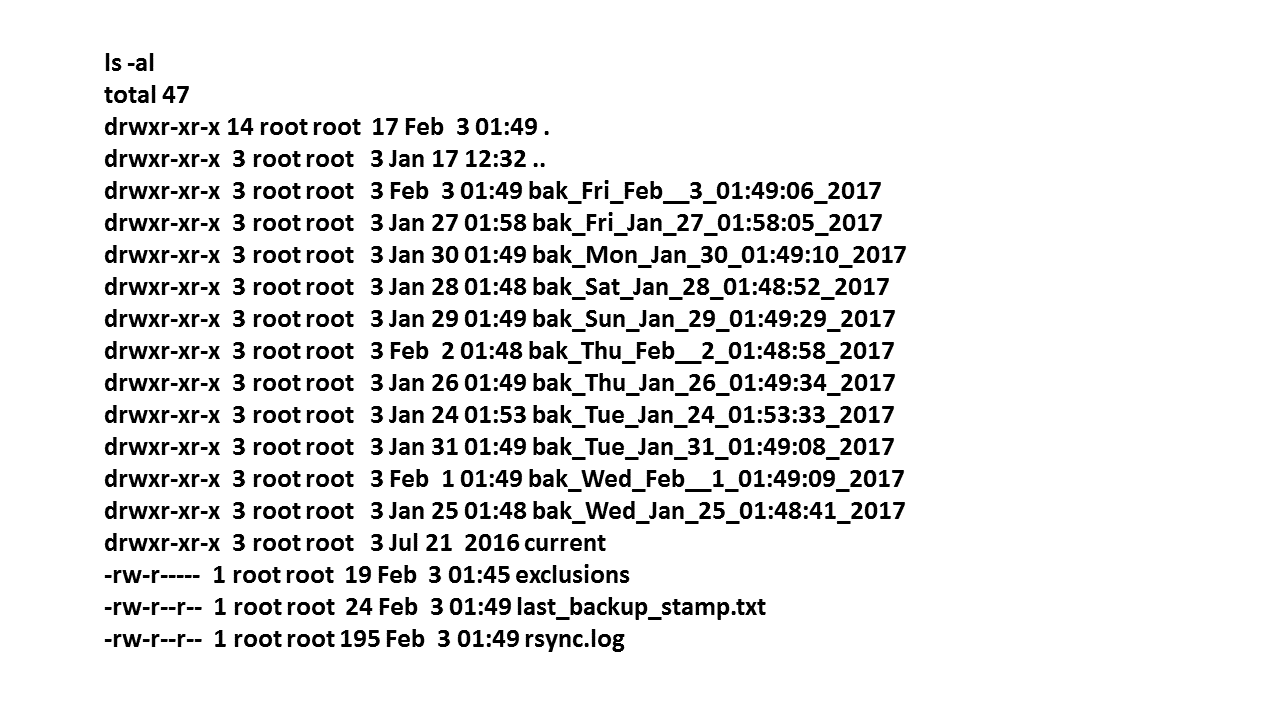
The directory current contains the current snapshot, whereas the bak_*
directories (each marked with the date) contain files changed or
deleted between the date of the directory and the backup cycle
preceding it. The current directory and each of the bak_*
directories contain the actual files and directories being backed up; in
the example above - the directory home/bukowski and its backed up
content.
The files on the backup mounts can be listed, browsed, and looked into
using regular Linux commands (cd, less, cat, text editors) or graphical
File Manager tool (if connected to cbsulogin or cbsulogin2 via VNC).
Access permissions are the same as those on the source directories, except
that the write permission is always revoked. The same tools can be used to
retrieve files from backup (just copy the files you want from backup
directories to wherever you need them).
Space considerations
How much disk space will your backup take on backup server? It all depends
on how many changes your source directory
undergoes each backup cycle. If changes (i.e., size of files being added,
deleted, or changed) are small, the bulk of the backup will be
concentrated in the current snapshot, while the bak_*
snapshots
(each containing only changes) will be negligibly small. In such a case
your backup size will be close to the size of the source directory. On the
other hand, if a lot of changes are made every day, the size of
each of the bak_* directories may become close to the size of the
current snapshot, in which
case the total size of your backup will be about [size of the source
directory] X (Retention/Frequency+1).
In practice, of course, the actual size will be somewhere between these
two extremes.
Few words of caution
- Avoid triggering big backup events. A big (and mostly
unnecessary) backup event may happen if one or more large files are
moved around between subdirectories or just renamed. If a large file
within backup root is moved or renamed, it will be transferred (with the
new name) to the current snapshot on backup server while its previous
copy (with old name, but otherwise identical) will be saved in a bak_*
snapshot. The result: extra network traffic during backup and doubled
backup storage charge.
- Avoid backing up the same directory multiple times. This may
happen, for example, when you back up your directory located within your
lab's storage group which itself is already backed up entirely
(i.e., without exclusions) by your lab manager.
- The backup does not follow symlinks. If a directory you are
backing up contains symbolic links (shortcuts) to files located
elsewhere, these files will not be backed up unless they are included
explicitly in some backup root directory.
My Storage page